-
Before You Check OutTo help us maintain a wonderful experience for future guests, we kindly ask that you:✅ Place the dirty dishes in the dishwasher, add the dishwasher pod(bottom drawer under fridge) , press power, select the wash cycle and close door which should start the dishwasher.✅ Place used kitchen and bathroom towels in the white laundry bin in the bathroom.✅ Open all blinds.✅ Turn off all lights and the TV.✅ Ensure all garbage, recycling, and compost are sorted into the correct bags and tied up.✅ Leave the door unlocked when you exit.✅ Send us a quick message through the Airbnb app to confirm your departure.Waste Disposal InstructionsGarbage & Recycling:Please take garbage and recycling to the large green metal bins at the top left side of the laneway, between the two large beige storage bins.One is marked Mixed Recycling, the other Garbage.Alcohol Empties:Place empty alcohol containers in the wooden shed labeled Alcohol Empties.Compost:Compost goes in the black bins located at the bottom right of the laneway.
Contact Us:
For any questions or assistance, please message us through the Airbnb app or VRBO app, depending on where you booked your stay. We’ll be happy to help!
Self Check- in
Suite Self Checkin & Privacy:
For your privacy, the interior door between the Suite and the main house will remain locked at all times.
Let us know if you have any trouble with the lock—we’re happy to help!
Your Suite is equipped with a smoke alarm for your safety. If it sounds and there’s visible smoke or fire, please exit immediately using any of the following doors:
• South sliding door
• South main door
• North door
A fire extinguisher and first aid kit are located under the kitchen sitting area for emergencies.
To avoid false alarms:
When using the toaster, place it under the range hood and turn the hood fan on before toasting.
Silencing the alarm:
If the alarm goes off unnecessarily, press and hold the center “Hush” button to silence it temporarily.
⚠ Watch Your Step:
Be careful of the step at each doorway, especially the lip of the sliding door.
Lights
Lighting Guide:
There are light switches for various areas of the Suite:
North Door Switches (left to right):
1. Hall lights
2. Outdoor receptacle
3. North outdoor light (by the door)
South Door Switches (left to right):
1. Main suite lights (dimmable)
2. Reserved for future use
3. South outdoor light (by the door)
4. Hall light
Bathroom Switches (left to right):
1. Main lights
2. Shower exhaust fan
3. Audio control for in-room speakers (see Internet & Entertainment below)
Ceiling Fan Light:
-
Controlled by the fan remote on the barn board wall near the kitchen.
-
Use the two bottom light buttons — press and hold to dim the lights up or down.
Under Kitchen Cabinet Lights:
-
Small push-button switch under the upper cabinets on the far right turns these lights on/off.
Dark Mode Lighting Tip:
For a cozy, dim atmosphere, try:
✔ Dimming the ceiling fan lights to your liking
✔ Turning on the under-cabinet lights
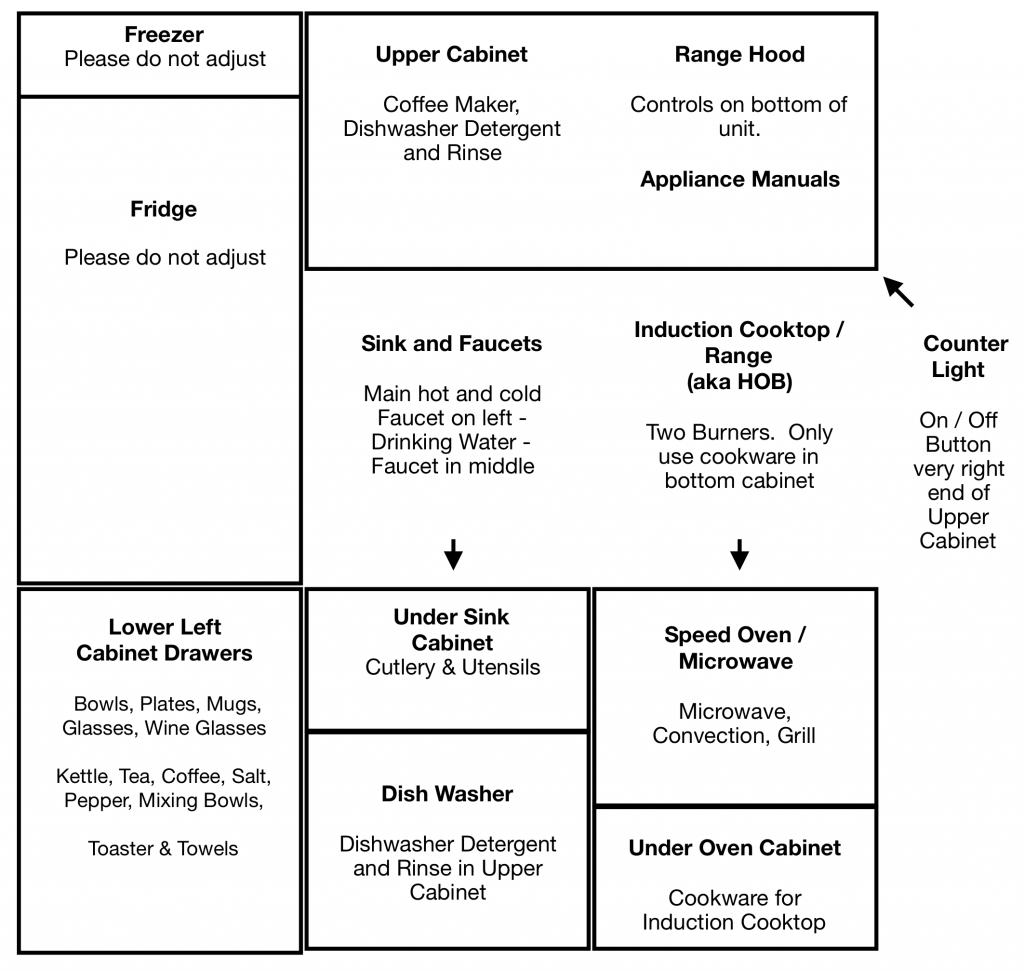
Kitchen Features & Important Notes:
Kitchen Overview
The kitchen includes: fridge, sink, induction cooktop, dishwasher, stove, and range hood.
Instructions:
-
Induction cooktop and stove instructions are available and also posted inside the upper right cabinet.
Important Notes:
1️⃣ Use only the induction-compatible pots provided in the lower cabinet drawer with the induction cooktop.
2️⃣ The oven has microwave features—do NOT put metal objects inside when using microwave mode.
3️⃣ Please turn on the range hood when cooking greasy or smoky foods or toasting. Controls are under the upper right cabinet.
Additional Features:
• Over-counter lighting is controlled by a small button near the right end of the upper right cabinet.
• Feel free to use the upper and lower cabinets to store your food during your stay.
Waste & Recycling Guide
Bins in the kitchen (along the south wall):
-
Garbage (black bin)
-
Recycling (blue bin)
-
Organic waste (green bin)
Extra bags can be found at the bottom of each bin or in the bottom kitchen drawer.
Disposal:
If bins get full or when you check out, please tie the bags and take them to the disposal area:
Two green metal bins (one for garbage, one for compost) located beside the laneway you passed on your way to the Suite.
✅ Only organic waste goes in the green compost bin — no plastic or garbage, please.
Restroom
Toilet Use Guidelines:
The toilet is designed to accept only:
✅ Human waste
✅ Toilet paper
⚠ Do NOT flush:
❌ Feminine hygiene products (pads, tampons)
❌ Paper towels
❌ “Flushable” wipes (they are not septic-safe)
❌ Any hard, plastic, or metal objects
Flushing these items can damage the septic system, and guests will be responsible for any resulting repairs.
Thank you for helping us maintain a smooth and trouble-free system!
Laundry Facilities
Laundry Facilities:
Washer/Dryer Use
The combo washer/dryer is located under the bathroom vanity counter.
How to use:
-
Use only the laundry detergent provided (under the bathroom sink).
-
Turn the power ON.
-
Select your wash cycle by turning the knob.
-
Press the ON button again to start.
Important:
-
Please DO NOT use the “Wash & Dry” automatic function.
-
Instead, run a wash cycle first.
-
When finished, open the door, fluff your clothes, then start the dry cycle separately.
Internet and Entertainment
Wi-Fi Access:
Internet & Entertainment
-
Network Name: SuiteWifi
-
Password: Suitewifi
Please note, the internet is shared with the main house and other buildings, so speeds may vary. The Wi-Fi router is located in the main house.
Hardwired Connection:
If you prefer a wired connection, an Ethernet jack is available on the barn board wall by the table/counter.
Troubleshooting:
If the internet becomes unstable or stops working, please message us for assistance.
55” Smart TV
-
No cable or antenna connection
-
Supports Google Android mirroring & Apple AirPlay
-
Apps installed: Netflix, YouTube, Spotify, Prime Video, and more
-
Plex is pre-logged in, offering movies, TV shows, documentaries, and featured content
-
You can connect your own HDMI device using the second input on the side of the TV
USB Charging Outlets are conveniently located at:
-
Kitchen counter
-
Left and right sides of the bed
-
Receptacle under the TV
Heating and Cooling in the Suite
Heating & Cooling Controls
All heating and cooling controls are located on the barn board wall, just to the right of the kitchen counter.
Primary Heat Sources:
-
Wall Radiator: Located under the clothes hanger
-
Bathroom Towel Warmer
Both are controlled by the beige thermostat on the wall.
Secondary Heating & Air Conditioning
Use the remote mounted on the east wall.
-
For heat, select the Sun ☀️ mode.
-
For A/C, select the Snowflake ❄️ mode.
-
Set it to your desired temperature.
Ceiling Fan:
-
Controlled by the remote located below the thermostat
-
To turn on: Press any number button (the remote can be finicky, so keep trying until it lights up)
-
To turn off: Press the I/O button
Patio Furniture, BBQ and Accessories
Outdoor Patio & BBQ Use:
Patio Area:
• Enjoy the patio table and chairs (seasonal), 2 grey Muskoka chairs, propane fire pit, and BBQ under the pergola.
Propane Fire Pit:
• To turn it on:
1. Turn on the propane tank (access through side piece that comes off)
2. Turn the knob on the side of the unit to the on position
3. Push the ignitor button to light
• See directions on the side of the unit for more details.
Propane BBQ:
• The BBQ can be dangerous, especially if a grease fire occurs.
• Use wisely and ensure it is at a safe distance from the house.
To operate:
1. Turn the propane tank valve to the ON position
2. Turn on the gas valves on the front of the BBQ
3. Hold down the igniter button to light each burner
• BBQ utensils are available in the utensil drawer under the sink.
Cleaning Up After BBQing:
We kindly ask that you clean up the BBQ area for the next guest’s enjoyment. After using the BBQ, please:
1. Clean the grill: Brush off any leftover food and grease from the grill grates.
2. Clean BBQ utensils: Wash the BBQ utensils provided , clean and return them to their storage.
3. Turn off the gas: Remember to turn off the propane tank valve and gas valves on the BBQ.
4. Wipe down: If needed, wipe down the BBQ surfaces to keep them clean and ready for the next guest.
5.Cover the BBQ: Please remember to put the BBQ cover back on to protect it from the elements.
Thank you for your cooperation in keeping the BBQ area clean!
Walking Trails:
-
Explore our scenic trails through the trees, located south of the main house and red cabin.
-
To access: take the laneway to the right of the main house and follow it until you reach the open pond area.
-
There are two trail entrances:
-
Left side (East) of the pond
-
Right side (West) of the pond
-
-
Trails are currently unmarked—simply continue south until you reach a gravel road and fence/gate. This marks the edge of our property.
-
Returning north on either path will bring you back to the pond and up to the Country Suite.
Respecting Other Guests:
-
Please do not walk in front of or around the Country Cabin or Tiny Home.
-
These are private spaces, and your respect for guest privacy is much appreciated.
Mosquitoes & Summer Tips:
-
The bush area can be mosquito-heavy in the summer.
-
We recommend bug spray, light long-sleeve clothing, or covering up.
Road Walking & Biking:
-
Feel free to walk or bike down the lane toward the road.
-
The road isn’t busy, but vehicles may travel fast—please be alert and stay safe.
Cattle & Fencing:
-
You may see cattle grazing in the field beside the lane.
-
Please do not approach or touch the cows.
-
An electric fence surrounds the pasture—do not touch it, as it will give a shock.
-
The cows are lovely to observe from a safe distance.
Solar Panels
You’ll notice several solar panel assemblies around the property. These panels generate green energy that powers our farm and contributes to the wider electricity grid—something we’re proud of!
They’re fascinating to see up close, but for your safety:
-
Please do not stand on the structures
-
Do not touch any controls or electrical cabinets
If you’re curious about how they work, just let us know—we’d be happy to tell you more!
The Barn (Restricted Area)
Our barn is currently under construction and is not accessible to guests.
-
Even if the doors are open, please do not enter unless you’ve been directly invited.
-
The area may contain hazards such as tools, equipment, or ongoing work.
If you’re interested in what’s happening with the barn project, feel free to reach out—we’re always happy to share more about our farm life and projects!
Wildlife in the Area
Being in the countryside means you may encounter or hear wildlife during your stay. Here’s what to expect:
-
No bears are in the area.
-
Coyotes or wolves may be heard at night, but they keep to the forest and do not approach buildings.
-
Skunks, groundhogs, squirrels, raccoons, and other small animals may be seen during the day or night.
⚠️ Important Reminder:
Wild animals are generally more afraid of you than you are of them. Please give them space, do not feed or approach them, and they’ll continue on their way peacefully.
You Are Responsible for Your Safety
When you checked in, you signed our Liability Waiver Form. This serves as a reminder of your responsibilities during your stay:
• You are the primary agent responsible for your own safety.
• This is a wilderness and rural area; some hazards may not be immediately apparent.
• Use common sense in your activities—always prioritize your safety.
• Alcohol consumption can impair judgment and affect safety. By consuming alcohol, you release us from liabilityrelated to these effects. Alcohol consumption by anyone under 19 is not permitted.
• The activities you choose to engage in on our property are done at your own risk.
• You are responsible for any damage to the property and cabin.
• Please remember, only human waste and toilet paper should be flushed down the toilet. Any other items can damage the septic system, and you will be held responsible for repairs.
• By staying on our property and signing the waiver, you acknowledge and accept these risks, and release Thom and Lisa Mills, Ron and Karon Mills, and Randomize, Inc. from liability.
Thank you for your understanding and cooperation! Let us know if you have any questions or concerns.
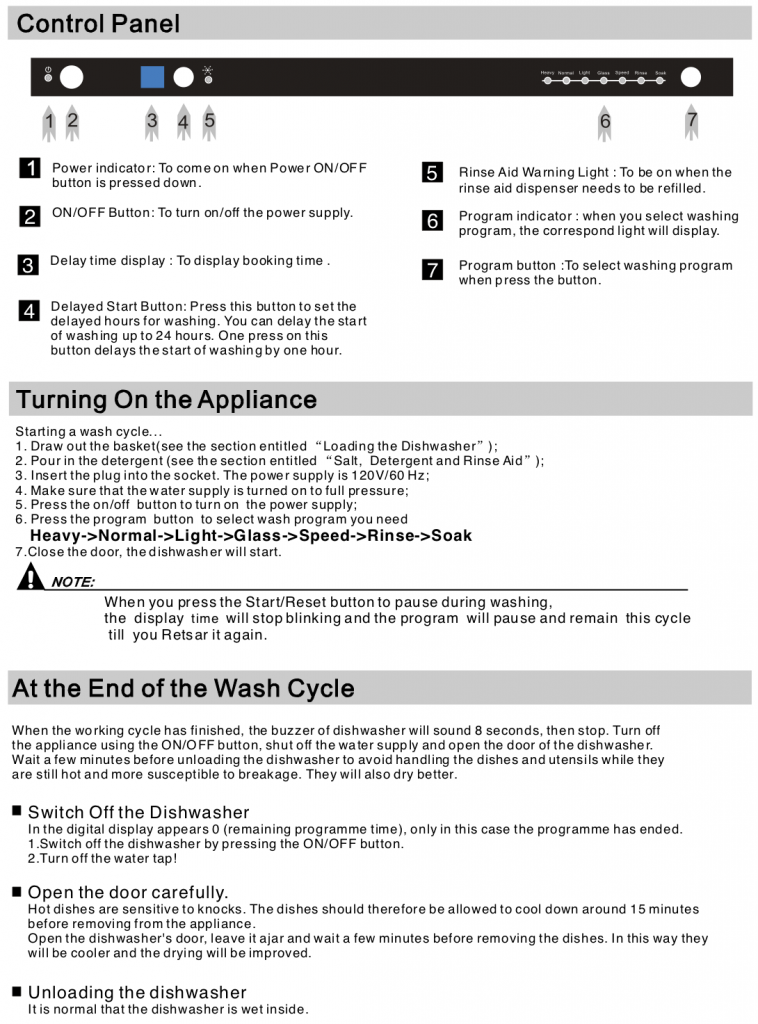
Dishwasher Operation:
-
Press the on/off button to turn on the power.
-
Press the program button to select your desired wash cycle: choose your cycle
-
Heavy → Normal → Light → Glass → Speed → Rinse → Soak
-
-
Add the dishwasher tablet and top up rinse aid (in the bottom drawer under the fridge)
-
Close the door, and the dishwasher will start automatically.
Enjoy your clean dishes!
Oven Operation:
-
Oven Instructions:
-
Turn On – Press the Right Knob.
-
Select Function – Press the Right Knob again and turn to choose your cooking mode.
-
Set Time/Temp – Press Left Knob to adjust time/temperature.
-
Start Cooking – Press the Right Knob to start.
-
Pause Cooking – Press Right Knob to pause. Adjust settings if needed, then press again to continue.
-
Turn Off – Hold Right Knob until the oven turns off.
-
Enjoy cooking!
Washer/Dryer Use
The combo washer/dryer is located under the vanity counter.
How to use:
-
Use only the laundry detergent provided (under the bathroom sink).
-
Turn the power ON.
-
Select your wash cycle by turning the knob.
-
Press the ON button again to start.
Important:
-
Please DO NOT use the “Wash & Dry” automatic function.
-
Instead, run a wash cycle first.
-
When finished, open the door, fluff your clothes, then start the dry cycle separately.
Country Suite Appliance Guide
Dish Washer – Oven – Cook Top
Welcome to our Country Suite!
We are thrilled to have you stay with us and hope you enjoy the amenities we’ve provided for your comfort. We kindly ask that you take care of the appliances and all items in the Suite during your stay.
Please note that the following usage guides provide only the basics for each appliance. For more detailed information, you can refer to the individual appliance manuals, which can be found in the upper right cabinet next to the Range Hood.
Feel free to reach out if you have any questions or need assistance! Enjoy your stay!
1) Rinse Aid – The Dish Washer must have Rinse Aid in it in order to run any cycle. you will find Rinse Aid in the upper left cabinet over the sink.
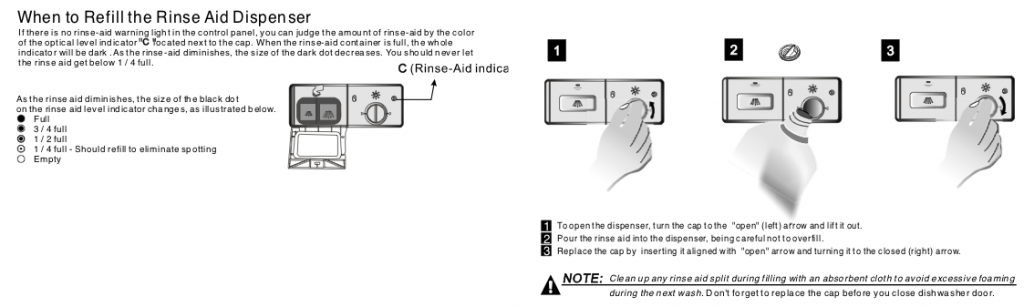
2) Detergent – The dispenser must be refilled before the start of each wash cycle following the instructions provided in the Wash Cycle Table. The dishwasher uses less detergent and rinse aid then conventional dishwashers. Generally, only one tablespoon of detergent is needed for a normal wash load. Also more heavily soiled items may need more detergent. Always add the detergent just before starting the dishwasher, otherwise it could get damp and will not dissolve properly.

3) Dish Washer Operation
Oven / Microwave (Lower Right)
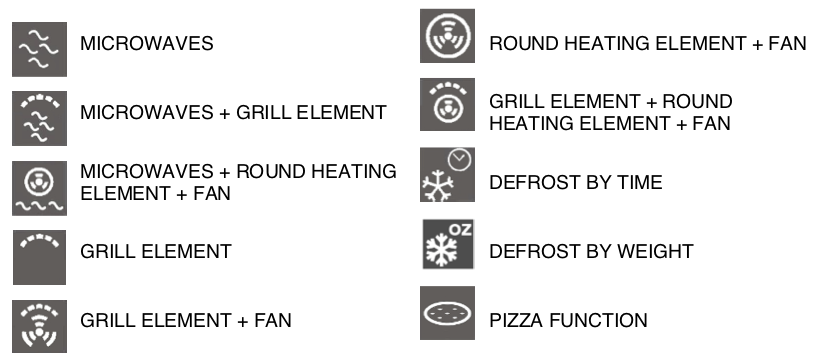
The Speed Oven is a combination oven that includes microwave, convection (round heating) and a grill element. These features can be used in combination. DO NOT USE the metal rack when using microwave mode.
Modes Available
Control Knobs

Left knob allows you to set the time, select the cooking temperature and duration and additionally program the cooking start and end times.
Display Area
Right knob allows access to the ovens operating settings.
Operation
Turn On – Press Right Knob Once
Select Function – Press Right Knob again. Turn Right Knob right or left – Selected function turns red in display – mode’s default cooking time and temperature are shown on display
Change Function setting – Press Left Knob Once and Time setting will start flashing – turn Left Knob right or left to adjust. Press Left Knob again to choose temperature or other second setting.
Start Function – Press Right Knob to start
Adjust Function / Pause Cooking – Press Right Knob and Oven will pause. Change settings as noted above. Press Right Knob to restart with new settings. Opening Door will also pause cooking.
Turn Off – Press and hold Right Knob until oven turns off
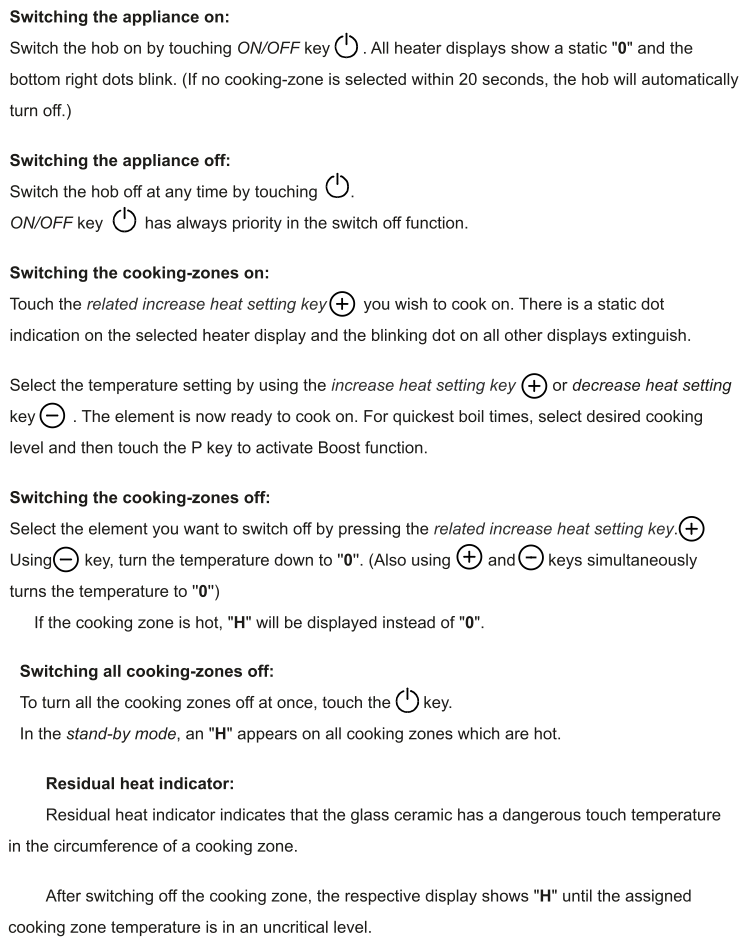
Induction Cooktop (HOB)
The cooktop is a two-burner induction cooktop, and it will only function with the pots and pans provided in the lower right drawer, as these are induction-compatible. The cooktop will only operate when one of these pots or pans is placed on the burner.
Please ensure to use the provided cookware to avoid any issues. Let us know if you have any questions or need assistance!
Note:
For Timer Control and additional information, see the
Porter and Charles C130V
manual in the upper right cabinet.
 uim
uim